Wednesday, June 27, 2012

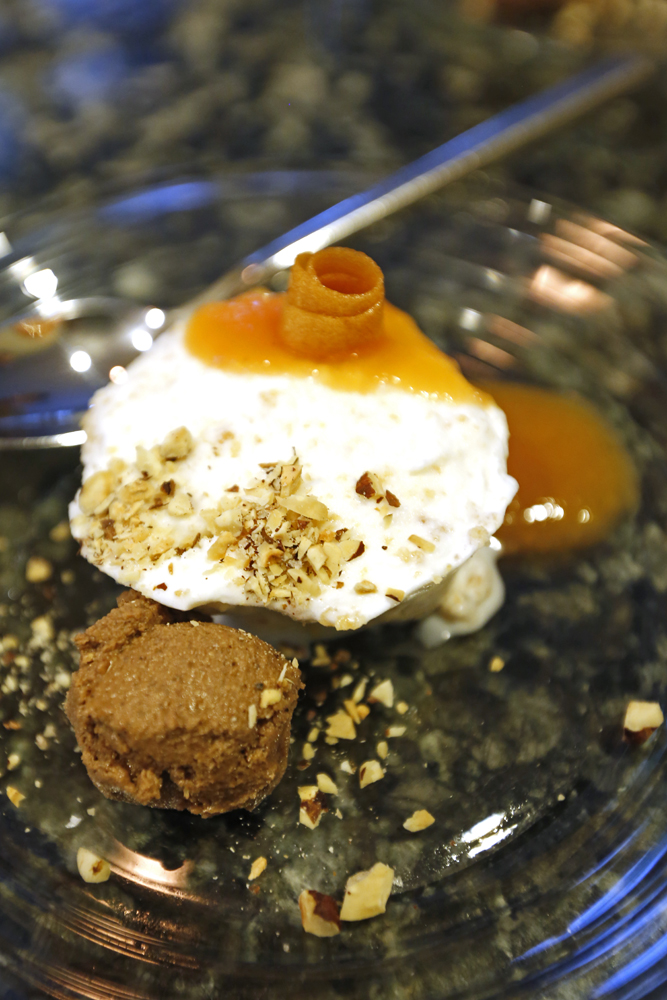
Buttered Baguette Ice Cream + Gianduja, Peach Sauce, and Peach Leather

I saw this idea for an add-in for store-bought vanilla ice cream in a great ice cream article by Tara Bench in LHJ and had to develop it from scratch as part of a summer version of fresh baguette with chocolate-hazelnut paste and peaches. It's one of those things you just have to taste to believe. Use some special butter like Plugra for the richest, crunchiest bits of baguette throughout the ice cream. Be amusing and top with what you'd usually put on baguette, like gianduja or a fruit sauce instead of jam.

Buttered Baguette Ice Milk

roughly 3 tablespoons Plugra butter
15 1/4-inch slices of baguette bread
2 tablespoons neufchâtel cheese
1 1/2 cups 2% milk (like Whole Foods 365 brand)
1/2 cup heavy whipping cream
1/2 cup cane sugar (like Whole Foods 365 brand)
1 tablespoon vanilla
1/8 teaspoon Maldon sea salt flakes

Preheat oven to 375 degrees. Butter both sides of the baguette slices and set them on a pan. Put it the oven for about 10-15 minutes until all start to lightly brown and become crunchy. Set aside on a plate for a couple of hours or even overnight. When it's completely cooled and crisp, pulse baguette slices in the food processor until you have fine crumbs. Set aside.

Whisk the cheese, milk, whipping cream, sugar, vanilla, and salt together. Put into your ice cream maker and let it spin for about 30 minutes; you'll know when it's ready when you see it start to fluff up and creep up the sides of the container as it goes around. At this point, spoon in the baguette crumbs. Once they're dispersed, immediately spoon ice milk into a container and place it in the freezer for at least 4 hours so it hardens. Top as you wish -- see above for tips -- or serve it plain. (Makes 1 quart.)


I love the ease and expertise in this video about making raspberry tuiles and wondered if the same technique would work with peaches. It does! It seriously tastes like a fresh peach Fruit Roll-Up. You can also cut it up into shapes or roll it into tiny cylinders as a part of this dessert.

Peach Leather

6 peaches (for peach purée)
2 tablespoons cane sugar
pinch of Maldon sea salt flakes

Preheat oven to 200 degrees. To make the purée, peel and pit peaches, and then put the flesh into a blender. Set it on high for a minute until there are no lumps. Into a bowl, strain out the pulp using a fine-mesh sieve. Rinse the blender and then add strained juice, sugar, and salt and blend on high for another minute.

Line a rimmed baking sheet with a silpat. Spread peach mixture in a thin layer across it. Bake for 2 hours. Lift it carefully using a knife to loosen the edges. Use scissors to cut sections of it from the pan. We rolled 1/2-inch strips into small, loose rolls as a pastry decoration and placed them on a plate to set.

Peach Jam / Peach Sauce

12 peaches (peeled and pits removed)
2 1-inch strips of lemon zest
juice from half a lemon
pinch of Maldon sea salt flakes

Mash peaches in bowl with a potato masher. Add peaches, lemon zest, lemon juice, and salt to a medium saucepan. Cook on a low or simmer setting for an hour. Stir occasionally, about every ten minutes. Let jam cool before you spoon it into containers. For a smooth peach sauce, strain the warm jam through a fine-mesh strainer or put it through a food mill. Store either in a jar in the fridge and use within a week or put up a jar in the freezer to enjoy later.

Gianduja

For my first time making this, I just followed this classic chocolate-hazelnut paste recipe to a T and added a small scoop of it plus toasted, finely chopped hazelnuts on the dessert.


For more fun with peaches, check out some of our other recipes:

Grilled Peach Ice Cream

Peach + Tarragon Pesto Pizza

Oven Roasted Peaches and Cream

Sweet Potato Pancakes with Peaches and Pecans

Monday, June 25, 2012

eaTABLE Supper Club: June 24, 2012

What a night! On Sunday, we cooked a 6-course dinner for 16 people under the stars in a beautiful outdoor kitchen. We couldn't have pulled it off without our wonderful hosts, the Fishes, and our friends Margot McNeely of Project Green Fork, who coordinated and decorated, and Jody Moyt, Executive Chef at Owen Brennan's, who kept things calm and moving forward in the kitchen.


This is the third eaTABLE supper club event presented by us here at The Chubby Vegetarian. (We did all-vegan comfort food last fall for comforTABLE. And our first one with a Latin theme back in 2010 was actually the first eaTABLE!) 


It's hard work to prepare and present so many dishes to so many people in an unfamiliar kitchen. It's usually an all-weekend event for us from menu planning to shopping at the farmers markets, to prepping the sauces and ingredients, and then packing, transporting, and unpacking. It's fun, but can be a little head-spinning. Why do we keep doing it? It's simple, really. This particular group of people are such an appreciative audience. They are there for the experience and to try something new, so that is what we wanted to give them.


We called the menu comporTABLE, which means 'appropriate and suitable'. Since we were eating poolside out in the heat, we wanted to keep the food fairly light. Here is what we came up with for the menu:


1. Banh Mi Spring Rolls
Local Shiitake Paté, Cucumber, Do Chao, Sriracha

2. Corn + Fennel Stuffed Squash Blossom 
Grilled Zucchini, Crookneck Sauce, Fennel Pollen


3. Grilled Watermelon Steak
Jewel Tomatoes, Goat Cheese, Honey-Lime Vinaigrette

4. Deconstructed Potato Salad
Truffled Grilled Potato, Five-Minute Egg, Pickled Mustard Seed, Greens


5. Chorizo Stuffed Pepper
Chipotle-Tomato Sauce, Corn Nuts


6. Buttered Baguette Ice Cream 
Peach Jam, Gianduja


We had a blast cooking and are so glad that we were asked to participate this time. In other news, we will have information for you this week about another upcoming TCV dinner at an East Memphis restaurant in late July; we would love it if some you would be able to attend!

Wednesday, June 20, 2012

Cheese-Stuffed Anaheim Chili Pepper

The pepper crop from Concord Farms is rolling in, and we've been using them as fast as we can. We have pickled a bunch of jalapeños, used fragrant green bell peppers for the filling of a socca crepe, and been lit on fire by some unidentified pepper that looks a lot like a devil's horn.


We are pepper-rich these days with almost every kind of pepper you can imagine -- except poblanos.  No poblano, no problem-o. This is a dish similar to the ubiquitous "Chili Poblano" you will find on the menu at most Mexican restaurants.We used the light green variety of Anaheim peppers in the place of the poblanos with delicious results. 


Cheese-Stuffed Anaheim Chili Pepper

6 Anaheim peppers (about 5 inches long)
1/2 pound smoked Gouda (shredded)
1 cup canola oil (for frying)
1/4 cup all-purpose flour
Spiced Batter (recipe follows)
Chipotle Tomato Sauce (recipe follows)
sour cream 
Mexican crema (to garnish)
finely chopped pickled jalapeño (optional, to garnish)


Using a paring knife, make a slit all the way down the long end of the pepper without going through to the other side. Gently open the pepper and insert your knife in order to cut the seeds loose from the top of the pepper. Pull out the seeds with your hands. Stuff each pepper loosely with the Gouda cheese. Repeat until all peppers are stuffed. 


In a large frying pan over medium-high heat, heat the canola oil until it shimmers.


Dust each pepper in the flour in order to allow the batter to adhere to the pepper's slick skin. Roll each stuffed pepper one at a time through the Spiced Batter and make sure every surface is covered. (This will keep the cheese from leaking.)


Lay the pepper into the hot oil and allow it to cook for about 2 minutes before turning. Once all sides are golden brown, remove the pepper and place onto a parchment-lined baking sheet in a 350-degree oven to keep warm. It's best to fry the peppers in batches of 2 or 3.


To serve, place a spoonful of the Chipotle Tomato Sauce onto the center of a plate, top that with one Cheese-Stuffed Anaheim, and garnish with sour cream and pickled peppers. It goes well with rice and beans on the side.


Spiced Batter

1 egg (beaten)
3/4 cup all-purpose flour
1/2 cup water
1/2 teaspoon garlic powder
1 teaspoon finely chopped cilantro
sea salt and cracked black pepper (to taste)


Mix the egg, flour, water, garlic, cilantro, salt and pepper together in a large bowl. Use a whisk to work out any lumps. The batter should be thicker than pancake batter.


Chipotle Tomato Sauce 

2 cups chopped Roma tomato
1 smoked chipotle pepper (from a can)
1 cup sweet onion
1 teaspoon ancho chili powder
1/2 teaspoon cumin
2 tablespoons tomato paste
sea salt and cracked black pepper (to taste)

Place the tomato pepper, onion, chili powder, cumin, and tomato paste into the work bowl of your food processor and blend until smooth. Place mixture into a medium pot over medium heat and allow mixture to cook until thickened. Stir the mixture often to prevent the bottom from scorching. Season with salt and pepper. Set aside.


Monday, June 18, 2012

Caramelized Fennel + Corn Gnocchi

We had this dish at Andrew Michael Italian Kitchen here in Memphis about 2 1/2 years ago, and it's been on our own at-home dinner menu ever since. The combination is perfect. The corn retains a crunch and adds a subtle sweetness to the sauce, and the fennel, when caramelized, becomes mild and creamy. This dish is proof that you can do a lot with a few ingredients and a bit of imagination.

The sauce comes together in no time, so if you buy the gnocchi you could be eating this dish in under 30 minutes from start to finish. Try this one at home; you will love it.

Caramelized Fennel + Corn Gnocchi

Microwave Gnocchi
1 tablespoon unsalted butter (like Whole Foods 365 brand)
2 cups fennel (cored, thinly sliced)
1/8 cup sliced shallot
1/4 cup white wine (like pinot Grigio)
1 cup corn (one large ear cut away from the cob)
1 cup half and half
1/2 cup grated parmesan (more for garnish)

sea salt and cracked black pepper (to taste)
fennel fronds (for garnish)
black truffle oil (optional, for garnish)


Make the gnocchi according to the recipe and set it aside while you make the sauce. Heat a large pot of salted water to a boil. Once the sauce is finished, you will need that water to cook the gnocchi. 


In a large pan over medium heat, melt the butter and add the fennel and shallot to the pan. Continue to cook until the fennel is soft and translucent and beginning to caramelize, about 15-20 minutes. Turn the heat up to medium-high and deglaze the pan with the wine. Allow the wine to reduce until most of the liquid has evaporated. Turn off the heat, add the corn, half and half, and the parmesan cheese. Stir to incorporate.


Cook gnocchi in boiling, salted water until they float. Remove gnocchi from the water using a slotted spoon and place it directly into the sauce. Toss to coat. Divide gnocchi between 4 plates and garnish with fennel fronds, black truffle oil, sea salt and cracked black pepper to taste. (Serves 4.)

Saturday, June 16, 2012

Rosemary-Lemon Cookies

We asked a good friend of ours who is expecting twin girls this summer if she was having any cravings. She was ecstatic about all kinds of sweets, especially the rosemary shortbread someone she knew made recently, and that sounded really good to us, too, right about now.

There's so much rosemary flourishing in the garden--big, established plants that come back even stronger each spring--and sometimes it's tough to find a use for all of it since it grows so fast. The first steps of this cookie recipe are chopping up the leaves of a fragrant fistful of just-picked rosemary and then using your hands to mix it with sugar, salt, and lemon zest; this makes the kitchen smell amazing.

The funny thing about these is they fall on that line between sweet and savory. Kind of like our hazelnut-black pepper cocktail cookies, it's your call: have them with milk or top with parmesan and  enjoy them with a glass of wine.

Rosemary-Lemon Cookies

1 tablespoon fresh rosemary (stems removed; finely chopped)
1/4 teaspoon sea salt
1/2 teaspoon lemon zest (from 2 organic lemons)
1/2 cup cane sugar  (like Whole Foods 365 brand)
2 tablespoons light brown sugar (like Whole Foods 365 brand)
1 egg
1/2 cup olive oil margarine (melted)
1 teaspoon vanilla
1 1/2 cups all-purpose flour (unbleached; like Whole Foods 365 brand)
1 teaspoon baking powder (aluminum-free; like Whole Foods 365 brand)

(First, a trick for easily getting the leaves of the rosemary off the stems: press the stems into your cutting board and the leaves will flatten, allowing you to cut a bunch of them off the stem at once. Pulling them off bit by bit is too much of a pain!)

Combine rosemary, salt, lemon zest, cane sugar, and brown sugar in a bowl. Mix it well and set aside. In another bowl, whisk the egg and then add the margarine and vanilla and stir. Pour in the sugar-rosemary mixture and stir. Set aside. Whisk together the flour and baking powder and add to the wet ingredients. Mix until none of the flour is visible. Chill dough in a container in the freezer for 30 minutes.

Preheat oven to 350 degrees. Place chilled dough onto lightly floured surface, flour your rolling pin, and roll out thinly to about 1/4-inch thickness. Use a cookie cutter or a glass to cut cookies. Place on 2 parchment-lined cookie sheets and bake until edges are golden brown, about 12 minutes. (Makes 24 cookies.)

Thursday, June 14, 2012

Blueberry Cream Snow Cones

This snow cone is actually an easy granita, but isn't it more fun for everyone to go ahead and call it a snow cone? We miss pulling up to the old SnoBiz , the one that was in the parking lot of Poplar and Kirby in East Memphis. We used to hold up the line considering the dizzying array of sugary choices only to ultimately decide on our usual. We'd either get Mud Pie or Black Cherry, both with extra cream on top for richness. That's the idea that inspired this dessert. 


These snow cones were made with fresh, in-season blueberries and local honey, which may make it the best snow cone you've ever had. We added orange flower water (available in specialty grocery stores or online) to reinforce the floral nose truly fresh blueberries possess. You can do this same operation with other berries and add whatever you like to the top to customize your own grown-up snow cone. 


Blueberry Cream Snow Cones


2 pints fresh blueberries
2 cups water
1/2 cup cane sugar (like Whole Foods 365 brand)
juice of 1 lemon
1/4 teaspoon orange flower water
2 tablespoons local honey

half and half (to garnish)


In a medium pan over medium heat, cook the blueberries, water, sugar, and lemon juice for 10 minutes to soften the berries. Run the mixture through a food mill or blend it in a food processor and strain it using a fine mesh strainer in order to remove any of the blueberry pulp. Stir in the orange flower water and the honey. Allow the mixture to cool.


Pour mixture into a 9 x 13 inch ceramic casserole dish and place into the freezer. After one hour, stir the mixture; use a fork to break up any lumps and return it to the freezer. After another hour, use a fork to scrape the surface of the ice, stir, pack it back town, and return it to the freezer. After one additional hour, it will be ready to serve.


To serve, scrape the surface of the ice with the tines of a fork. This will create what looks like purple snow. Using an ice cream scoop, place two scoops in a cup, top it with a 1 1/2 teaspoons of half and half, and enjoy. (Makes 6 servings.)

Tuesday, June 12, 2012

Grilled Muffuletta Pizza + Pickled Mustard Seeds


(We just had to feature a grilling recipe today in order to highlight Jennifer Chandler being mentioned on thekitchn.com during their grill week for her cookbook Simply Grilling! What a great thing to wake up to on a regular old Tuesday morning.)


Hey, don't be afraid to grill pizza dough. It's way easier than it sounds. The best part is that you can make the dough and put this whole meal together in less time than it takes to order a mediocre pizza. You can use this grill top method for all other kinds of pizza, too -- on the same night, we also made truffled grilled potato pizza with goat cheese.


For our mash-up of a pizza, make the olive dressing a day (or at least a couple of hours) ahead of time, and assembling it will be easy from there. The Pickled Mustard Seed recipe is something you'll just have to wait to see. Sure, there are other versions out there, but we talked Andy and Michael out of their Andrew Michael Italian Kitchen recipe, and it'll be included in an upcoming article we wrote for Edible Memphis.


Grilled Muffuletta Pizza


Beer Pizza Crust (makes 3 crusts)
Vegetarian Olive Dressing (recipe follows)
olive oil (like Whole Foods 365 brand)
1 pound provolone cheese (shredded)
Pickled Mustard Seeds or Creole Mustard
1 cup chopped parsley


Follow my beer crust instructions, but be sure to omit the honey since it will burn on the grill. There is no need to allow time for the crust to rise either. This is a quick dough. 


Turn your outdoor grill on the highest setting and shut the lid in order to preheat it. Roll each dough ball out as thinly as you can; use a rolling pin to make about a 10-12 inch crust. Don't worry about it being a perfect circle -- this is supposed to be rustic. 


Drizzle each circle with about a teaspoon of olive oil and rub it into the surface of the dough on the top and bottom. Using your hands, lay a disk of dough onto the grill grates. Once the top surface is bubbly and the bottom side is nicely marked, remove the dough, using a pair of kitchen tongs, from the grill and set aside. Depending on your grill, this process should take about 3 minutes. Repeat with the other two portions.


Top the cooked side (the side that was face-down on the grill) of the crust with 1 1/2 cups Vegetarian Olive Dressing and 1/3 of the provolone. Return the pizza to the grill top for another 3 minutes or until the cheese has melted. Garnish with a tablespoon of mustard and 1/4 cup chopped parsley. (Makes 3 pizzas. Serves 6-8.)

Vegetarian Olive Dressing

2 to 3 cups spicy, pitted olives (green, black, and kalamta)
2 stalks celery (about 1 cup, sliced)
2 cups cauliflower
1 large carrot (about 1 cup, sliced)
roasted red peppers (chopped)
8-12 peperoncini peppers (optional, chopped)
2 teaspoons good Italian seasoning mix (Whole Foods has a really good one in the bulk spices section.)
4 cloves garlic (crushed)
1 cup olive oil (like Whole Foods 365 brand)
1 cup white vinegar

Using the slicer blade on your food processor, slice the olives, celery, cauliflower, and carrots. Place sliced vegetables into a 2-quart container; add the red peppers, peperoncini peppers, Italian seasoning mix, crushed garlic, olive oil, and vinegar. Allow mixture to marinate and the flavors to meld for a day or so...seriously, the longer you leave it, the better it will be. (Makes 2 quarts. Keeps in the fridge for up to a month.)

Sunday, June 10, 2012

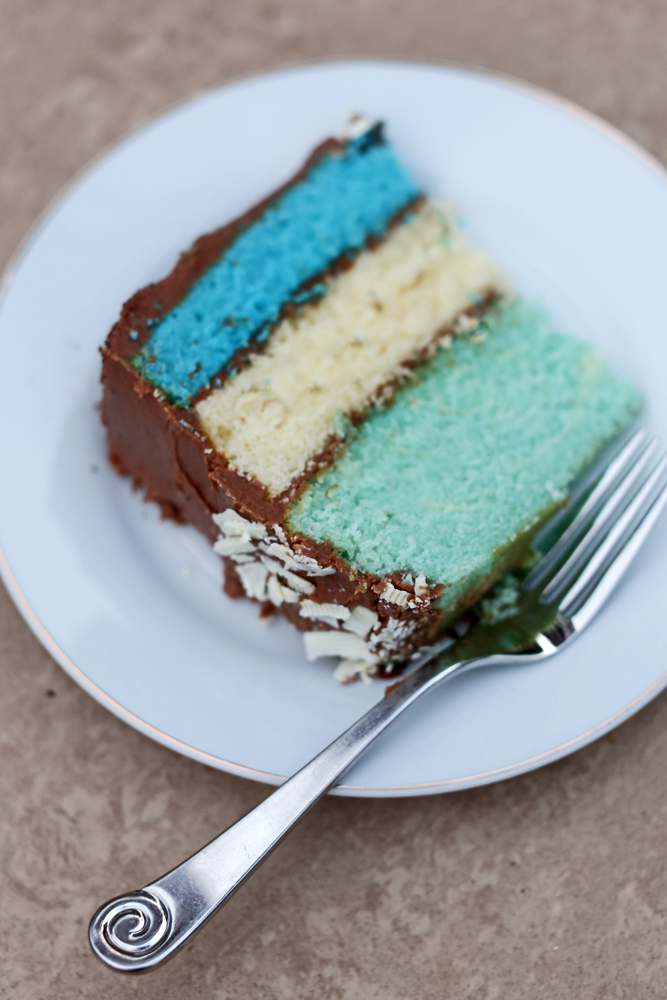
Gender Reveal Cake for a Boy

This week, we felt honored to be chosen to bake the cake that revealed my brother and sister-in-law's big news to the family: it's gonna be a boy! SO excited to have another nephew running around.

We did a ton of very serious research and learned a lot about making a gender reveal cake. Having never even been to this type of party before, we knew it would be a blast and wanted our cake to taste really good and also be really striking in the big moment.

Here are our baking notes, which might be of use to those of you who can foresee this type of event coming up soon for someone you love:

1. Stay with the tried-and-true recipes. This is not the time to test out any weird ideas. The cake was a simple butter cake (recipe doubled) and the frosting was sour cream milk chocolate (I subbed 2 Whole Foods organic milk chocolate bars and half a dark chocolate bar in the recipe, which calls for chocolate chips).

2. The color blue does not occur in natural foods. Blueberries would look purple, and sure, we could have tried cabbage-blue cake, but barring that, sometimes you just have to raid the back of the cabinet and break out the food coloring used once a year for Christmas cookies.

3. Do different layers: four drops of blue for sky blue, eight drops for a medium blue. (We included a plain white layer for contrast and normalcy. All blue just seemed a bit much.)

4. Don't just make a white cake with blue or pink frosting filling. Everyone will know the deal once the coated knife comes out after the first cut, and it makes for a better reveal if you have to wait a sec to see the cake color all at once.

5. Cutting out parchment circles is a lifesaver when it comes to getting the cakes out nicely. Just trace the bottom of the pan with a pencil and then set the parchment circle into the bottom of the fully buttered and lightly floured pan.

6. Run a knife along the edges of the pans to loosen the edges. (A lettuce knife is good to use once the cakes have halfway cooled because it won't scratch up pans like metal knives.)

7. Let the layers cool before placing a cutting board on top of the cake-side of the pans and flipping cake onto the board. A fish spatula helped us safely move the layers to the cake carrier.

8. Choose a dark-colored frosting so that there's no chance of the color peeking through and ruining the surprise.

9. Put a dollop of frosting in the middle of the plate part of the cake carrier before setting the first layer down. It will help to make the base of the cake steady.

10. Instead of the typical packaged cake decorating items, we used a plain old peeler to make curls and shavings out of Callebaut white chocolate and dark chocolate blocks for the question mark on top and also for decorating the top and bottom edge.

11. You probably want to wear disposable gloves if you don't want to be frantically scrubbing color off your hands pre-party so as not to inadvertently alert people to the color of the cake you've baked!

12. A cake carrier helps to prevent any disasters in transport, and taping a pie/cake server to the top of it makes things a lot easier when it's cutting time.

Next up, maybe we'll try out a girl's cake. Honestly, making a strawberry cake would seem like it would be easier than something blue, but we tested blended strawberries in the batter from above, and it just make the sample cupcakes heavy enough to fall in...we'll get back to you on that!


Friday, June 8, 2012

Strawberry-Rum Compound Butter

The very last gasp of strawberry season calls for something like this: a sweet compound butter that can be frozen and then used all summer long on biscuits, toast, or banana pancakes. This is so easy to make -- and it tastes pretty amazing despite how little effort it requires!

Strawberry-Rum Compound Butter

2/3 cup very ripe strawberries (mashed)
2 tablespoons light brown sugar (like Whole Foods 365 brand)
1 tablespoon dark rum
1 stick unsalted butter (like Whole Foods 365 brand)
generous pinch of Maldon sea salt flakes

Set a stick of unsalted butter out on the counter so it can get to room temperature (about 20 minutes). Combine strawberries, brown sugar, and rum. Microwave for 1 minute, stir it, and then microwave for another minute. Let mixture cool for about 20 minutes. When butter has softened and and mixture has cooled, add in the salt and combine strawberry mixture and butter well; freeze it until set, about 2-3 hours.

When you are ready to use it, set container out for a few or microwave it for 30-45 seconds. Use a small scoop for individual servings, wrap it into individual logs for freezing and gifting, or get fancy (we learned the trick here) and smooth the top of it before serving in a small, round dish.

Wednesday, June 6, 2012

Cabbage Dogs

I was shooting a story written by my friend Stacey Greenberg for the Memphis Flyer about two brothers who started a hot dog business called Memphis Dawgs. Todd kindly offered me a hot dog, so I had to break the news to him. 


"It looks great, but I'm a vegetarian," I told him. He told me that he tried to sell tofu dogs, but he thought they were terrible and that he couldn't sell something he didn't like. I had to agree. 


Then he said something brilliant: "Man, if I was gonna make a vegetarian hot dog, I'd just roll up some good veggies like mushrooms and onions in a cabbage leaf and stick that on a bun." 


We took his sage advice and ran with it -- and got excellent results! It looks like a lot of steps, but it's really simple to put together and makes 10-12 dogs. You can make them ahead of time, so all you need to do when it comes time to eat is heat and serve.


Cabbage Dogs

1/2 cup French green lentils
1/8 cup yellow mustard seeds
1 tablespoon caraway seeds
1 1/2 cups vegetable broth (like Whole Foods 365 brand)
1 teaspoon dried sage

1 teaspoon red pepper
1 teaspoon marjoram
1/2 teaspoon garlic powder
2 tablespoons white vinegar
1 tablespoon canola oil
1 1/2 cups finely chopped onion (1 medium)
1 8-ounce package cremini mushrooms (finely chopped)

sea salt and cracked black pepper to taste
1 1/2 cups grated potato (1 small)
2 tablespoons tomato paste
2 large eggs (beaten)

1 large head of cabbage
10-12 hot dog rolls (preferably the poppy seed kind)
sweet relish, tomato slices, sour pickles, yellow mustard, and celery salt (for garnish)


In a medium pan over high heat, bring the lentils, mustard seeds, caraway seeds, broth, sage, red pepper, marjoram, garlic powder, and vinegar to a boil. Reduce heat; cover and simmer for 20 minutes or until most of the liquid has been absorbed and the lentils are cooked through but still firm. Set aside. 


In a large frying pan over medium-high heat, add the canola oil and then the onion. Sauté until translucent. Add the mushrooms and continue to cook until the mixture appears dry. Add salt and pepper to taste. Add the potato, tomato paste, and the lentil mixture. Stir to incorporate. Set mixture aside to cool before stirring in the eggs to create the filling.


Bring a large pot of lightly salted water to a boil and preheat your oven to 350 degrees. Using a paring knife, cut the thick part of the outermost cabbage leaf away from the root. Carefully peel the leaf away from the head and set aside. Repeat this process until you have 10 or 12 large cabbage leaves. Boil the leaves in boiling water until just tender (about 2 minutes each). This can be done in batches of 3 or 4. Set tender cabbage leaves aside to cool. (Reserve the remaining cabbage for another use -- maybe this or this?)


Lay one cabbage leaf down and then scoop 1/3 cup of the filling near the center of the leaf. Form the filling into a 3 1/2-inch-long mound. All you do then is roll the leaf up like a burrito: fold the sides over then roll the end nearest to you toward the top. Place on a parchment-lined baking sheet and bake for 20 minutes. Place a cabbage roll on a hot dog roll and garnish as you like. (Makes 10-12 Cabbage Dogs or about 6 servings.)


Friday, June 1, 2012

Spicy Quinoa + Black Lentil Salad with Avocado Vinaigrette

Summer salad time is here, and for lunch the other day, we wanted to make one that was more of a meal. There's no cheese and no bread in this -- unless you have a warmed tortilla on the side, like one of us just had to have -- but the quinoa makes it pretty filling. The trick is Avocado Vinaigrette, something that you can't really place in the finished dish that adds so much flavor. 


We're liking black lentils so much better than black beans. The flavor is very similar, but they only take 20 minutes to cook and require no pre-soak. We've been using them in place of black beans for months in huevous rancheros, burritos, and alongside fajitas. They're even good outside of Mexican cuisine. Check out our literal use of black beluga lentils here.


Trying to keep things simpler in our cooking lately has been a nice challenge -- new idea, new cookbook daydreams? Possibly! This particular recipe takes a little more in terms of time and effort, but it's worth it since it ends up tasting really fresh and healthy. 


Spicy Quinoa + Black Lentil Salad with Avocado Vinaigrette


Pickled Red Onion (do ahead; recipe follows)
1 1/2 cups prepared black lentils (like Whole Foods 365 brand)
1 1/2 cups prepared quinoa (follow package instructions)
1 cup diced green bell pepper
1 cup corn (cut away from the cob or frozen)
1/4 teaspoon chipotle pepper powder
1/2 teaspoon cumin

Avocado Vinaigrette (recipe follows)
sea salt and cracked black pepper to taste


To prepare the lentils, bring 1 cup of broth or water to a boil in a medium pan and add 1/2 cup dry lentils. Cover and simmer for 20 minutes or until all liquid has been absorbed. Prepare quinoa at the same time. Toast the corn kernels in a dry pan over medium-high heat until they start to brown a little. Allow the quinoa, lentils, and corn to cool. In a large mixing bowl, toss the onion (minus the pickling liquid), lentils, quinoa, pepper, corn, chipotle, and cumin together with the avocado vinaigrette. Taste and adjust seasoning. Serve on a bed of your favorite greens with sliced avocado, cilantro leaves, and a drizzle of olive oil.

Pickled Red Onion


1 cup diced red onion (about 1 medium)
1/4 cup white vinegar
1/4 cup water
1 teaspoon cane sugar
1/2 teaspoon sea salt


Add the onion, vinegar, water sugar, and salt to a food storage container. Allow mixture to sit in the fridge for at least 1 hour before serving. These are also great sliced for burgers or tacos.

Avocado Vinaigrette


1 cup cilantro leaves
1 clove garlic
juice of 1 lime
1 small fresh chili pepper (like a jalapeño)
1/4 cup white wine vinegar
1 teaspoon honey
sea salt and cracked black pepper to taste
1 small avocado

1/4 cup olive oil


Place the cilantro, garlic, lime juice, chili pepper, vinegar, honey, salt, pepper, and the flesh of the avocado into the work bowl of your food processor. Blend until smooth. While the processor is running, drizzle in the olive oil. Set aside until ready to use.

Thursday, May 31, 2012

Caprese-Style Stuffed Tomatoes

My wife brought home some cottage cheese on impulse from the store the other day, and it just kept staring at me from the refrigerator shelf. The ingredient seemed so '80s! All I kept thinking about was that it was the kind of thing people used to eat on a diet: cottage cheese on a tomato. That wasn't really doing it for me. So, I decided to taste it. It was really good and very milky and soft, much like fresh mozzarella. All of a sudden, the tomato idea didn't seem so bad. It just needed a little update.

Any regular reader of the blog knows we love a caprese salad. We have done a salad in a jar, a vegan version with tofu, a tart, and many more versions of this combo. Now we can add Caprese-Style Stuffed Tomatoes to the growing list.

Caprese-Style Stuffed Tomatoes

1/2 cup balsamic vinegar (like Whole Foods 365 brand)
4 medium tomatoes
1 16-ounce container of organic low-fat cottage cheese (like Whole Foods 365 brand)
1/4 cup olive oil (like Whole Foods 365 brand)
1 - 1 1/2 cups loose-packed fresh basil (torn or cut into bite-sized pieces)
1 tablespoon chopped chives
Maldon sea salt flakes and cracked black pepper (to taste)

In a small pan over medium-high heat, cook the balsamic vinegar until it is reduced by half. Stir constantly as the vinegar boils so as not to scorch the sugars. This should take about 5 minutes. Set aside to cool.

Cut the top off of each tomato and run your knife around the inside to dislodge the flesh and seeds. Pull out the flesh and seeds from each tomato and reserve them for another use. Season the inside of the tomato with salt and pepper to taste. Stuff each tomato with 1/4 to 1/2 cup of the cottage cheese. Drizzle the top of each tomato (and the plate) with the thickened balsamic reduction and olive oil. Garnish with basil, chives, and salt and pepper to taste.

Monday, May 28, 2012

Peanut Butter Swirl Greek Fro-Yo

Obsessed with the new Ben and Jerry's Greek frozen yogurt flavors, we decided to give our own a shot. I think this recipe is close enough to call it a clone of the original. The best part about making it at home is that you know exactly what's in it. In this case, it's a mere 6 ingredients. Plus, with the addition of homemade Magic Shell, it's delicious beyond belief. This one is fun for the kids -- they'll be so amazed by watching the warm chocolate harden before their very eyes.


The best fruit to use here is slightly over-ripe bananas. When the skin is spotty and black, most of the starch in the banana has converted to sugar, and the texture is unappealing. Blending them up in a smoothie or ice cream is the best use of them. The sweetness is perfect and the texture works for this application.


Peanut Butter Swirl 
Greek Fro-Yo


2 bananas (roughly chopped)
1 17.6-ounce container 2% Greek yogurt
1/4 cup honey
1/4 cup cane sugar (like Whole Foods 365 brand vegan cane sugar)
1/4 teaspoon sea salt
1/2 cup peanut butter (like Whole Foods 365 brand Creamy Peanut Butter)


Place bananas, yogurt, honey, sugar, and salt into your food processor. Blend until smooth. Pour into bowl of ice cream maker and start it. Put peanut butter into a bowl and microwave for 1 minute. Once the yogurt has firmed up (about 20 minutes), turn off ice cream maker and then pour a quarter of peanut butter in and pulse ice cream maker until PB is swirled throughout but not blended. Do the same with the remaining PB so that there are swirls throughout the yogurt. Pour yogurt into a container and freeze it for at least an hour before serving. (Take it out of the freezer 5-10 minutes to soften before scooping it.)


Magic Shell at Home


1 3-5-ounce dark chocolate bar
1 tablespoon coconut oil
pinch of sea salt


Microwave chocolate and coconut oil for one minute. Stir to combine. While warm, drizzle over ice cream. It really is magic.


Sunday, May 27, 2012

Veggie Chorizo-Stuffed Poblano Peppers with Corn Nuts Dust

We love it when people really enjoy the food we make.  We had family over this week and made this dish, and even a staunch meat eater was head over heels for it. The veg chorizo is similar to the texture of the real thing and would be good in a taco, burrito, in a taquito, with some Fritos -- even a incognito mosquito wouldn't veto this! 


Okay, here's the deal with corn nuts: I was looking for a non-disgusting snack at the gas station when I was on my way out to Conord Farms in Slayden, Mississippi. I picked up the Corn Nuts and, much to my surprise, they only had three ingredients: corn, oil, salt. That doesn't qualify as health food, but it was the best I could do at the time. Turns out that they are super-crunchy and delicious. (Whole Foods carries their own even-better-than-the-original version of Corn Nuts in the bulk section.) They kind of taste like the masa used to make tamales. They were the perfect thing to add a little texture and crunch to this stuffed pepper dish.


Veggie Chorizo-Stuffed Poblano Peppers with Corn Nuts Dust


4 large poblano peppers
1 medium white onion (2 cups roughly chopped)
3 large portobello mushrooms (about 5 cups roughly chopped)
1 green bell pepper (1 cup roughly chopped)
1 red bell pepper (1 cup roughly chopped)
6 cloves garlic
2 tablespoons sherry vinegar
1 tablespoon smoked paprika
1 teaspoon red chili flakes
1 teaspoon sea salt
1 teaspoon coriander
1 teaspoon cumin
1/4 teaspoon oregano
2 tablespoons canola

1/2 cup bread crumbs
1 cup shredded smoked mozzarella (more for topping)
1 egg (beaten)
1 cup Corn Nuts (pulsed in the for processor to produce a course crumb)
Enchilada sauce, sour cream, cilantro, diced avocado, sliced green onion (to garnish)

Roast the poblano peppers until blackened on your outdoor grill. Place into a bowl and cover until they are cool enough to handle. Run each pepper under cold water to wash away the blackened skin. Make a slit down the length of the pepper using a paring knife, pull out the seeds, and set peppers aside until they are ready to be stuffed.


Preheat the oven to 350 degrees. Using your food processor, finely chop the onion, portobellos, bell peppers, and garlic in batches and place them onto a large parchment-lined, rimmed baking sheet. Add the vinegar, paprika, chili flakes, salt, coriander, cumin, and oregano. Using your hands, toss the ingredients to incorporate. Spread the mixture evenly on to the baking sheet and drizzle with the canola oil. Bake for 20 minutes.


In a large mixing bowl, combine the spiced vegetable mixture with the bread crumbs, smoked mozzarella, and the egg. Mix to incorporate. Stuff each pepper with a generous amount of the mixture. Place peppers into a large casserole dish, cover with foil, and bake them in a 350 degree oven for 30 minutes. Remove the foil, top each pepper with more cheese and return them to the oven, uncovered, for another 15 minutes.


To serve place a spoonful of enchilada sauce onto a warm plate, place the pepper into the sauce, and top with about 1/4 cup of the Corn Nuts dust. Serve the condiments on the side so everyone can add what they like.


Tuesday, May 22, 2012

Herbal Lemonade

We planted almost all herbs in the raised bed this year, save for some tiny hot peppers and a couple of currant tomato starts, an exciting surprise gift from a fellow gardener. The pineapple sage, thyme, parsley, boxwood, purple, and sweet basil, nasturtiums, marjoram, tarragon, and borage have rooted, and they're all pretty much growing like crazy. It's a great time to start making lemonade with all kinds of the herbs you have available in order to kick off the summer. We had an abundance of thyme and lemon verbena, but you can substitute any wonderful combination of what runneth over in your garden bed.

Herbal Lemonade

juice of 6 lemons
20 ounces spring water
1 cup loose-packed thyme sprigs
3 6-inch sprigs lemon verbena
1/4 cup agave syrup
1/4 cup honey
2 tablespoons cane sugar (like 365 brand Vegan Cane Sugar)

Place all ingredients in a pitcher with a lid and shake it until the agave, honey, and sugar all dissolve. Let lemonade sit in fridge for at least 2 hours before straining it and serving over ice.

Thursday, May 17, 2012

Gingersnap S'mores (from the oven!)

You don't need a campfire or graham crackers to make this modern take on everyone's childhood favorite.  Gingersnaps add a little crunch and spice and a whole lot of interest to this classic dessert. Choose your favorite chocolate bar to ensure the deliciousness of this dish. We love the Lindt chocolate bar with a hint of sea salt.

It is quite worth it to seek out vegetarian-friendly marshmallows for this dessert. (Marshmallows are typically made with gelatin, a substance made mainly from pig skin and cattle bones.) I know that Whole Foods carries a brand of vegan marshmallows, Sweet n' Sara. You can also order Chicago Soy Dairy Dandies. Take your pick since they're both amazing.

This recipe is as easy as it looks and takes a total of 4 minutes to put together. That makes this the easiest and most delicious s'more around. Give it a try.

Gingersnap S'mores

18 ginger snaps (like Lars Own)
1 3-1/2 ounce chocolate bar (broken into 9 squares)
1 10-ounce bag vegan mini marshmallows

Turn the broiler of your oven on high. Lay half of the ginger snaps on a sheet pan, top each with a square of chocolate, and about 5 marshmallows. Place the try under the broiler for about 1 minute or until the top of the marshmallows blacken. Remove and top with the remaining gingersnaps. Wait for it to cool, and eat. (Makes 9 s'mores, which is about 4 servings.)

Wednesday, May 16, 2012

Quick & Hot Artichoke Dip

I made this dip all the time with my best friend when we were growing up and always hungry. It was our go-to snack, and to this day, I have no idea how we came up with it or when we first got the idea. Artichoke dip was just something one or both of us made just about every week and had at every gathering, whether it was just us two watching TV or a real party. This one takes about 5 minutes (at most) to prepare since everything just goes into the food processor. Once you make it yourself at home, you may not be tempted by the $9 restaurant appetizer version again; our version has a less cheese and mayo but tastes just as good.

Quick & Hot Artichoke Dip

1 can artichoke hearts (like Whole Foods 365 brand)
1/2 cup canola mayonnaise
1/4 cup parmesan cheese (plus more for topping)
1/4 teaspoon red pepper flakes
sea salt and cracked black pepper (to taste)
1 tablespoon olive oil
1/2 teaspoon sweet paprika
blue or white corn chips or slices of baguette (to serve)

Preheat oven to 350 degrees. Place artichoke hearts, mayonnaise, parmesan, red pepper flakes, salt, and pepper into the bowl of your food processor. Pulse until combined but not completely smooth. Brush a small baking dish with olive oil and spoon the dip into it. Top with the remaining olive oil and about 2 tablespoons of grated parmesan plus salt, pepper, and paprika. Bake for 15 to 20 minutes and serve with chips or baguette slices.

Makes 2 servings.

Tuesday, May 8, 2012

Tropical Waffles

Inspired by this recipe, we made pineapple compote this week and were thinking about how best to use it. It seemed like we had already gotten into a pint of peanut butter-banana Greek frozen yogurt every time dessert time came around, or maybe we just didn't have the right idea for pineapple. But then for Sunday breakfast, this idea seemed just right. These are banana waffles, and that plus the pineapple and coconut makes for a tropics-style breakfast that's almost like a dessert itself.


Tropical Waffles


1 banana (mashed)
2 eggs (separated)

1/4 cup canola oil (more for oiling the waffle maker)
1 cup 2% milk
2 tablespoons cane sugar
1 teaspoon baking powder
1/2 teaspoon sea salt
1 1/4 cups all-purpose flour (like Whole Foods 365 brand)

1/2 cup unsweetened coconut flakes
Pineapple-Rum Compote (recipe follows)


Toast the coconut flakes in a dry pan until lightly browned. Top waffles with Pineapple-Rum Compote and coconut flakes. Plug in your waffle maker and pre-heat it.


In a medium bowl mix the banana, egg yolks, canola oil, and milk until well incorporated. In a large bowl mix the sugar, baking powder, salt, and flour. In yet another medium bowl, whip the egg whites until fluffy. Add the wet ingredients to the dry ingredients, and stir to incorporate. Fold the egg whites into the batter.


Using a silicone pastry brush, oil both plates of the waffle maker. Spoon about 1/2 a cup of batter into each section of the waffle maker. Close the lid and cook for 4 minutes or until golden. Repeat until all of the batter is used.


To serve, place two waffles on a place, spoon 1/4 cup of the pineapple compote on top, and sprinkle with toasted coconut. Makes 6 waffles. 


Pineapple-Rum Compote


1 cup chopped pineapple
2 tablespoons unsalted butter
1/4 cup light brown sugar (like Whole Foods 365 brand)
1 tablespoon rum
pinch of Maldon sea salt flakes


Combine pineapple, butter, brown sugar, rum, and salt in a medium saucepan on medium heat. Cook for 20 minutes, stirring it often; it should brown a bit and produce a sticky sauce.