Thursday, September 19, 2013

Honey and Mint Cucumber Lemonade

What to do, what to do about the last-of-the-summer cucumbers coming in this month? It's fairly likely that many of y'all have had a bunch of your own to use up just like we do, and sure, there are limits to the volume of pickles, kimchi, and summer salads you can ingest without needing a new way to fix this vegetable. We figure it's time for a simple, refreshing late summer drink that takes really no time to make.

Come to think of it, we're being overtaken by the last burst of summer herbs as well. It's time to mix up some cucumber lemonade and throw in whatever else you like from the garden -- we're partial to mint here. Maybe this'll help us all cool down and slog through the few days left before the relief of fall.

Honey and Mint Cucumber Lemonade

3 cucumbers
juice from 1 lemon
2 tablespoons local honey
scant 1/8 teaspoon Kosher salt
fresh mint (for garnish)

Juice the cucumbers in the juicer or run them through the food processor. Strain the juice and discard pulp and seeds. Mix in a pitcher or a glass with lemon juice, honey, and sea salt and serve over ice garnished with mint leaves. (Makes 2 lemonades, but the recipe is easy to scale to serve more people.)


Tuesday, September 3, 2013

Red Velvet Cornbread

If we eat with our eyes, then this cornbread is a feast in and of itself. The bright magenta color doesn't come from a bottle, but from a single roasted beet that's mixed into the dry flour. Wasn't it nice of us to give sweet, lowly, humble cornbread a visual lift? It's like we plugged it into the wall and flipped the switch to neon.

This inaugural batch became a part of one of our favorite dinners: cornbread, peas, and greens. We added more roasted beets to the top just because they're delicious. 

Red Velvet Cornbread

1 cup cornmeal
1 cup all-purpose flour

1 cup diced roasted beets
1 teaspoon baking powder
1/2 teaspoon Kosher salt
1 cup smoked cheddar
1/4 cup minced red bell pepper
1/4 cup butter + 1 tablespoon
2 tablespoons honey
2 eggs (beaten)
1/2 cup 2% milk

1/2 cup 2% Greek yogurt

Place a 10-inch cast-iron skillet into a cold oven and preheat it to 400 degrees. In the work bowl of your food processor, mix together the cornmeal, 
all-purpose flour, roasted beets, baking powder, and salt. Blend until beets are completely incorporated into the flour and the mixture has taken on a pink hue. In a medium bowl, mix together the cheddar, pepper, melted butter, honey, eggs, milk, and yogurt and whisk. 

Next, add the dry ingredients to the wet ingredients. Stir until just incorporated. Using a sturdy, reliable oven mitt, carefully remove the hot cast-iron skillet from the oven and place it onto a trivet. Place the remaining tablespoon of butter into the skillet and swirl it or use a silicone brush to coat the bottom of the pan. Pour the batter into the pan and place the pan into the oven for twenty to twenty-five minutes. Run a knife around the edge and turn the cornbread out onto a cutting board. Serve hot with greens and black eyed peas. (Serves 4-6.)

Friday, August 30, 2013

Pulled Eggplant BBQ

Click HERE to order our new cookbook, The Chubby Vegetarian: 100 Inspired Vegetable Recipes for the Modern Table (Susan Schadt Press, November 2016). The book features two delicious BBQ recipes that you need right now.

Check out the simplified update here: http://chubbyvegetarian.blogspot.com/2014/01/bbq-eggplant-sliders-with-caesar.html

Clint, my buddy who’s also the editor of grilling.com, was kind enough to ask us to write a guest post, and we are thrilled to be here. Let me give you a quick intro about who we are and then we'll get right to it: some really good food. 

We’re Justin Fox Burks and Amy Lawrence, bloggers at The Chubby Vegetarian. We’re a husband-and-wife team out of Memphis, Tennessee, and we have a new cookbook out called The Southern Vegetarian: 100 Down-Home Recipes for the Modern Table (Thomas Nelson, 2013). Our goal is not to take your bacon away, but to show the world all the great meals that are possible with vegetables. We want to help you take vegetables from the side dish to center of the plate, and we do that by thinking in a whole different way. 

This pulled eggplant dish uses an ancient method of cooking eggplant by charring the skin, which imparts a smoky flavor and a meaty texture to the dish -- much like roasting a red pepper over an open flame. From there, we remove some of the moisture and spice it with our Memphis BBQ Dry Rub, and last, we toss it with some smoky, sweet BBQ sauce. It may just be the best eggplant you'll ever put in your mouth.

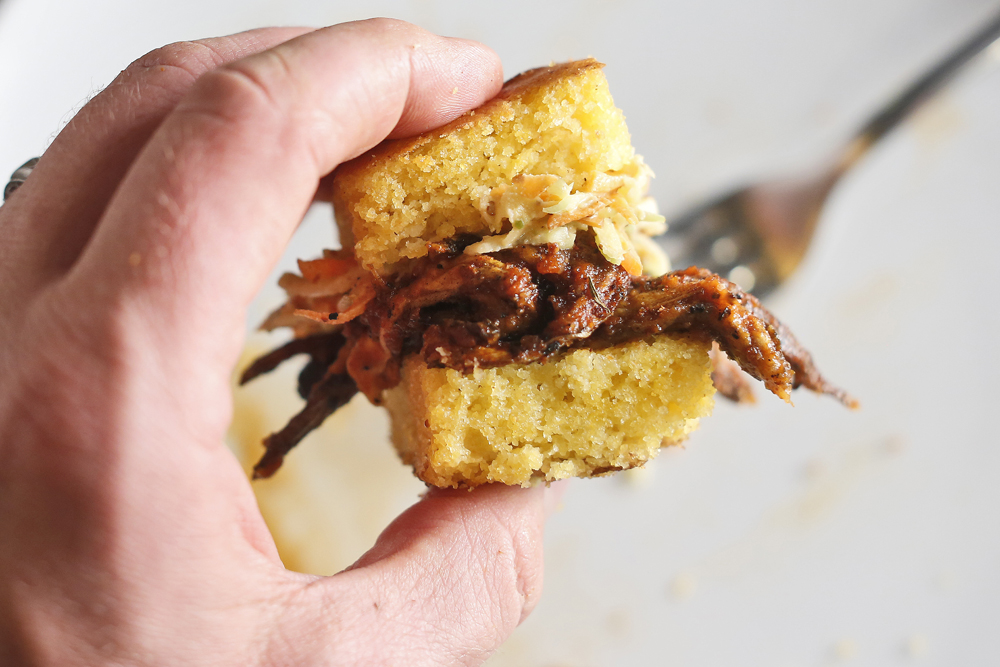
Once you've prepared our Pulled Eggplant BBQ, you can serve it any way you'd like: on a bun, over spaghetti tossed with BBQ sauce, or our current favorite, on squares of freshly-baked cornbread with a little slaw and extra sauce. This recipe serves 2 to 4 folks, but if you have more to feed, just double or triple the recipe. 

Thanks for hanging out with us and enjoy the recipe!

Pulled Eggplant BBQ

1 pound Japanese eggplant
2 to 3 tablespoons Memphis BBQ Dry Rub (recipe follows)
1 tablespoon sesame oil
1/2 cup Chipotle BBQ Sauce from The Southern Vegetarian Cookbook 

Char the whole eggplants over the open flame of your burner or on a very hot grill until the skin is black and flaky and the eggplant has begun to collapse. This will take about 10 minutes of total cooking time. Remove eggplants and place into an airtight container until thoroughly cool. 

Peel eggplant by running your hand down the length of the eggplant to remove the charred skin. Discard skin and remove the top part that was connected to the vine. 

Create strips from the eggplant by peeling the flesh into 6 to 8 pieces. It comes right apart with the grain of the eggplant. On the trays from your dehydrator or a parchment-lined baking sheet,  arrange the strips of eggplant in a single layer. Apply the dry rub liberally to the strips of eggplant. 

 If using the dehydrator method, simply set the timer for 1 hour at 125 degrees. If you’re using the oven, set the temp to the lowest possible setting, prop the oven door open, and set the timer for 40 minutes. 

The eggplant should look fairly dry at this point. Toss eggplant with the sesame oil and about 1/4 cup of warm BBQ Sauce. Allow it to rest for 10 minutes. (Serves 2 as a main or 4 as a first course; know that this recipe is easily scaleable.) 


Memphis BBQ Dry Rub

Mix together one teaspoon of each: chipotle, smoked paprika, sweet paprika, garlic powder, salt, cumin, black pepper, brown sugar, thyme, oregano, and ancho chili. Store extra dry rub in an airtight container for up to six months.

Sunday, August 25, 2013

Flame-Grilled Portobello Mushroom Steak + Arugula Salad & Grilled Potatoes

My job as a photographer takes me to some really interesting places. Recently, I was wading hip-deep out onto a rocky shoal to capture fly fishermen outside Heber Springs, Arkansas. That night I stayed at the cabins at Fat Possum Hollow on a beautiful piece of land tucked between Sugarloaf Mountain and some smaller foothills. Dinner in the barn that night was simply salad, potatoes, pork chops for most and there was a flame-grilled portobello mushroom for me. It was perfect.

The whole experience of being out in nature and the unfussy, shared meal with friends both old and new got me thinking about simplicity -- and the lack of it in my life. It was one of those Thoreau-esque moments, y'all. I don't need that kind of uncomplicated existence all of the time, but it sure is nice to visit it every once in a while.

Luckily, this vegetarian version of a classic meat-and-potatoes dish can transport me back to that state of mind anytime I want. I've not spent this little time preparing a meal in a while. You barely need a knife to prepare it, and in fact, there is almost no prep at all.

Flame-Grilled Portobello Mushroom Steak + Arugula Salad & Grilled Potatoes

1 teaspoon porcini salt
1 teaspoon smoked paprika
1 teaspoon granulated garlic
1 teaspoon dried thyme
1 teaspoon crushed red pepper
1 teaspoon cracked black pepper
Olive oil (for drizzling)
1 1/2 teaspoons sherry vinegar
2 large portbello mushrooms
15-20 small or fingerling potatoes
2 cups loose-packed arugula
3 tablespoons vinaigrette of your choice*
1/2 cup sun-dried tomatoes
1 small shallot (sliced)
Parmesan or bleu cheese (to garnish)
Kosher salt and cracked black pepper (to taste)

In a small bowl, mix the porcini salt, paprika, garlic, thyme, red pepper, and black pepper. Set the dry rub aside. Drizzle olive oil and sherry vinegar onto both sides of the mushrooms and then coat generously in the dry rub; reserve about 1/3 of the rub. Set mushrooms aside in the fridge for at least 30 minutes or until ready to grill.

Place potatoes onto a baking sheet. Preheat your oven to 350 degrees. Drizzle clean potatoes with olive oil and sprinkle with the remaining dry rub. Place potatoes into the oven for 30 minutes or until tender. Remove and set aside.

Just before you are ready to eat, preheat the outdoor grill to high. Grill mushrooms for about 5 minutes per side or until well-marked by the grill grates. Toss cooked potatoes onto the grill to warm them through.

In a medium bowl, toss the arugula, vinaigrette, tomatoes, and shallot together until greens are well coated. Plate mushrooms and potatoes. Top each mushroom with dressed salad and garnish with cheese. (Serves 2.)

*Simple Vinaigrette

Juice of 1 lemon
1 teaspoon honey
1 tablespoon olive oil
Kosher salt and cracked black pepper (to taste)

Place the lemon juice, honey, olive oil, salt, and pepper into a jar, close the lid, and shake. Set aside until ready to use.

Thursday, August 22, 2013

Berbere-Spiced Grilled Okra With Ricotta

We've been covered up in cucumbers, dealing with a ton of tomatoes, and processing a peck of peppers. It's the time of year when the garden is in full swing -- but so is work. There is so much to do and not a whole lot of time available to do it. Still, we pick vegetables, and we're compelled to roast, pickle, ferment, and freeze the best of the season so that we can enjoy homegrown everything all year long.

That's not the only advantage to having a farmer in the family. We also get a great supply of vegetables to eat fresh. Okra is one of our favorites. It's great oven-fried, pickled, in gumbo, and as we recently discovered thanks to our friend Jennifer Chandler's book, Simply Grilling
(Thomas Nelson, 2013), we now know that it's also stellar grilled. 

We took her method and twisted it a little by switching out the Cajun seasoning for Ethiopian berbere spice and dipping the grilled okra in some thinned ricotta, which is similar to the fresh cheese served with Ethiopian dishes. This is a simple winner when  okra appears in your C.S.A. or your friendly neighbor drops by with a pint or two from his bumper crop.

Berbere-Spiced Grilled Okra With Ricotta

about 5 cups whole, fresh okra
1 tablespoon canola oil
1 tablespoon vinegar
1 teaspoon salt-free berber spice* (like the fiery version from Penzey's)
1 teaspoon Kosher salt

1/4 cup ricotta
1/4 cup 2% milk

Preheat the outdoor grill to high. In a large bowl, toss the okra with the oil and vinegar to coat. Thread okra onto skewers and season generously with the berbere spice and salt. Grill 3 to 4 minutes per side or until well marked by the grill grates. Remove from the grill and set aside.

In a small bowl, combine the ricotta and milk until well incorporated. Serve okra next to the thinned cheese mixture for dipping. (Serves 4 as an appetizer.) 

*Make your own using Marcus Samuelson's recipe and omit the salt.

Tuesday, August 13, 2013

Mocha Banana Smoothie

This smoothie was made out of necessity one morning when nothing was going right. Around here, a trying morning usually involves one of the following minor annoyances: realizing that we've run out of something important, an appliance not working or suddenly breaking, or a minor injury due to sleepiness/carelessness. Well, on this particular morning, we had all 3 of these things go wrong in the space of about 5 minutes.

So. Only one thing would fix this mess: some coffee. Not able to fix it any of the usual ways, I busted out the blender and figured I'd make do by using some instant espresso powder I had in the baking supplies box. I'd make this smoothie again even if I wasn't in a pinch! I thought while I dashed around getting ready and drinking it up that day. It saved the whole morning.

Mocha Banana Smoothie

3 bananas (peeled, frozen in chunks)
4 teaspoons instant espresso powder (mixed with 1 cup water)
1/2 cup almond milk
2 tablespoons chocolate syrup (We like this kind.)
2 tablespoons agave nectar
2 pinches of sea salt

Blend all ingredients well in blender. (Serves 2.)

Wednesday, August 7, 2013

5 Quick Questions with Carolyn Nichols of The Church Health Center + The 40 Days to Better Living Cookbook

We grew up with Carolyn and her sweet family, so when we heard about all that she and the folks at the Church Health Center in Memphis are doing to help people get their home cooking on the right track, we had to know more. She and the staff at the CHC have a new cookbook out with some recipes we really want to try, including Carrot Soufflé, White Cheddar Herbed Grit Cake over Mixed Greens with Honey-Fig Vinaigrette, and also the Whole Grain Breakfast Quinoa, for starters.  Learn more about and order the 40 Days to Better Living Cookbook HERE and check out our interview with Carolyn below! Here's more about the cookbook straight from the source.

Carolyn Nichols: Basically, our cookbook puts a healthy spin on traditional favorites.  We try to use items and products everyone has heard of, and everything we purchase comes from Kroger, so it's easily accessible to all. We put the the nutritional analysis and the cost on each recipe. There is no author listed for the book because it was truly a group effort. I came up with about 70% of the recipes, the other 30% of the recipes are from other CHC staff members and interns, our dietician did the nutritional analysis, lots of staff tested and proofread the recipes, and our PR team took on the task of working with our publisher.

1. TCV: What do you do at the Church Health Center here in Memphis?

CN: I teach healthy cooking classes to adults, teenagers, and children. I health-coach new and established CHC Clinic patients.

2. TCV: What are a couple of easy changes folks can make to their diets for a big impact when it comes to health?

CN: We talk about easy changes daily in our classes. Some of our favorites: use less cheese, switch from whole milk to low fat or skim milk, measure your fats, switch from salt to herbs and spices, drink more water, eat fruit or yogurt for dessert on the weekdays and save the ice cream/cake/cookie type treats for the weekends. The main thing we want our participants to take away from the class is the proper serving size of a food item. We focus on serving size because even though a recipe is healthy, it still has calories, so we don't want to eat the entire dish!

3. TCV: Favorite healthy dinners for people who are in the middle of busy August back-to-school time?

CN: Favorite healthy dinners for back to school: quesadillas,  easy pasta dishes, and stir-frys! There are several in the cookbook.  All three of these items can be made quickly, and lots of veggies can be thrown in. My favorite from the cookbook: shrimp etouffee, grilled eggplant quesadillas, and the tomato and eggplant pasta.  All 3 of these recipes can be done in 45 minutes or less.

4.  TCV: What was it like to work on the 40 Days to Better Living Cookbook -- and do you and your family (or your co-workers) agree on a favorite recipe in it?

CN: It was a learning experience for sure working on a cookbook. I didn't know what all went into preparing one. It was fun, though, and made me closer to my coworkers.  It was fun having testing days in the kitchen were we would invite staff, family, and friends in the kitchen to test recipes. Those days were my favorite days of getting the cookbook ready. My family's favorite recipe is the shrimp cakes with avocado salsa. It's a light and fresh recipe that's great for summer. My kids' favorite is the banana bread and the delicious granola with cherries and raisins.

5. TCV: Okay, just as soon as I heard you talk about it, I had to know more: how do you make your to-go breakfast, oatmeal in a jar?

CN: Oatmeal in a Jar

1/2 cup oats (not instant)
3/4 cup unsweetened almond milk
1/2 cup Greek yogurt (I use Fage 0%, but you can use a fruit flavor if you want it sweeter.)
1/2 cup fruit (1/2 a banana, 1/2 cup blueberries or 1/2 cup raspberries)

Place items in a jar and stir well. Cover and let set in the refrigerator overnight. Stir and sweeten with honey in the morning if desired.  (Sometimes I'll add a spoonful of nut butter or almonds or walnuts if I know it's going to be a while before I can eat again.)

Tuesday, August 6, 2013

Kombu-Cured Watermelon Crudo + Hot Peppers & Chives

This is the particular kind of awesome that comes from brainstorming with a chef like Andrew Adams of Acre Restaurant. While working on a menu for our upcoming Arts Memphis Culinary Series Dinner, we started discussing items that would be great on a shared plate. We started talking about curing, compressing, and drying and what these processes would do the the texture and appearance of different fruits and vegetables. (I know: from this, you are able to gather that we're both unbearably exciting, right?) He landed on a date jerky, and I wanted to try a cured watermelon.

A few days later, Andrew sent me a link to the Studio Kitchen blog recipe, which uses kombu, a type of dried seaweed very high in glutamate, the substance that is responsible for umami and used to cure fish. I decided to give it a shot with watermelon that I had dehydrated enough to give it a concentrated flavor and a meaty texture. I love it!

Special equipment: food dehydrator and vacuum sealer (optional)

Kombu-Cured Watermelon Crudo + Hot Peppers & Chives

1 personal-sized seedless watermelon
4 pieces of kombu (dried seaweed, available at Whole Foods)
Juice from 2 limes
2 jalapeño or serrano peppers (very thinly sliced)
good-quality olive oil (to garnish)
Snipped chives (to garnish)
Sea salt flakes and cracked black pepper (to taste)

Cut the watermelon into a large square by trimming off all of the sides to reveal the heart. Trim off any rind that remains. Cut into 2" x 2" x 4" blocks -- you should get 4 from a small watermelon.
Place watermelon blocks into a 125-degree dehydrator for about 4 hours until the short side has reduced by roughly half; at this point, it should measure just over 1". Briefly rinse kombu under cold water and place along the top and bottom of the dehydrated watermelon. Either vacuum seal or place into an airtight container in the fridge overnight.

Remove watermelon from container and discard kombu. Using a sharp knife, thinly slice each block of the watermelon and shingle onto a plate. Garnish each with 1/4 of the lime juice, a few hot pepper slices, a drizzle of 1/4 teaspoon of olive oil, a few chives, and salt and pepper. (Serves 4 as a first course.)

Sunday, August 4, 2013

Zucchini-Pumpkin Pancakes

We've already made a variation of this great chocolate-zucchini-pumpkin bread recipe three times this month after a search for a zucchini and pumpkin combo led to A Hippie with a Minivan. We turned it into muffins, though. And deleted the chocolate chips. And added some oil. You know how it goes. We thought of it like cupcakes plus vegetables and topped it with some dark chocolate and cream cheese frosting for a family dinner this summer.

Making do with what you have and getting done what you need to get done no matter what the weird circumstances are...those are our goals this week. We've had to get a little creative recently since our little kitchen pretty much went off the rails this week. It's so sad! We can handle one minor calamity at a time, no problem -- like when water from the kitchen faucet got ahold of a light electric charge one Friday afternoon a few months ago. Hand washing was very odd all of a sudden, not unlike an at-home nerve block. Got that mess fixed up right away.

But this week, in the space of a few days, it's one thing after another in the kitchen -- lighting, faucet, oven all going haywire -- sort of a lot at once. We're working on it and can't wait for normal to make its way back here.

When you're a healthy mix of stubborn and resourceful, though, in the face of some overwhelming broken-down-kitchen business, you find a way to make muffins anyway. And then you use the same basic batter to make Sunday morning pancakes. A surprise: they turned out even better the second way, and as a bonus, used up some summer zucchini.


Zucchini-Pumpkin Pancakes

1 1/2 cups flour (we used half all-purpose and half whole wheat pastry flour)
1/2 teaspoon sea salt
1/2 teaspoon baking soda
1 teaspoon cinnamon
2/3 cup canned pumpkin
1/4 cup canola oil
1/4 cup milk
2 eggs
1/2 cup sugar
2 teaspoons vanilla
1 heaping cup zucchini (grated)
olive oil margarine (for skillet)
blueberries and sliced bananas (optional)
maple syrup

Whisk together flour, salt, baking soda, and cinnamon. Set aside. Whisk together pumpkin, canola, milk, eggs, sugar, and vanilla; add zucchini. Combine this with flour mixture until just mixed. Heat a skillet to medium-low. Melt margarine in skillet and coat it once it's melted. Pour about half a cup of batter into skillet for each pancake. Don't turn them until you see some bubbles and some drying around the edges -- watch carefully! -- then flip them. Top with blueberries, bananas, and maple syrup. (Serves 4.)

Wednesday, July 31, 2013

Romesco Crostini with Charred Spring Onions

Romesco is a traditional sauce made with almonds and peppers, and it's served in innumerable preparations in Spain. In the springtime, charred onions are dipped into Romesco for a special treat. This playful take on that tradition is the perfect thing to set out at a party with some olives. Everyone will love onions cooked this way.  The burnt exterior is pulled away to reveal a soft and sweet, almost candy-like inside that is a great foil for the spicy Romesco spread. We have a sweet memory grilling them on the 4th of July with our friends during this grilled vegetarian paella extravaganza.


Romesco Crostini with Charred Spring Onions

12 to 15 purple or green spring onions
1 medium head garlic
1 medium red pepper

1/3 cup roasted and salted almonds
1/3 cup chopped sun dried tomatoes (softened in warm water)
1/3 cup torn baguette
1 teaspoon red pepper flakes
1 tablespoon olive oil
1 teaspoon sherry vinegar
1/2 teaspoon smoked paprika

12 to15 grilled or toasted thin baguette slices (for serving)
12 to 15 slices of Manchego (for serving)

Preheat outdoor grill to high heat. Place the green onion, garlic, and red pepper on the grill and turn frequently until completely charred on all sides; the amount of time on the grill will vary depending on how hot your grill gets. Place it all into a bowl and cover with foil until it's cool enough to handle. Cut the top off of the bulb of garlic and peel and seed the roasted red pepper. 

Into the work bowl of your food processor, squeeze the soft garlic from the head, add the roasted red pepper, almonds, sun dried tomato, bread, red pepper flakes, olive oil, sherry vinegar, and smoked paprika. Run the food processor until a paste forms -- you're looking for a thick and spreadable consistency.

To serve, slather about a teaspoon of Romesco sauce onto a toasted baguette. Top that with a peeled charred onion. Simply squeeze the onion bulb from the root end to reveal a sweet, translucent morsel. Top with a slice of Manchego cheese. (Serves 4 as an appetizer.)


Saturday, July 27, 2013

Caramelized Apple Spice Muffins (+ A New Contest!)


(UPDATE, 7.31.2013: Congratulations to commenter #14, Melvin Teal! This RNG site chose you as the winner! Please message us on Facebook with your address or leave a comment on this post-- we moderate  comments and will not publish it, of course. Thanks to all who participated -- we're looking forward to the next TCV contest coming up soon!)

Our buddy Chris at Whole Foods in Memphis gave us a box full of different kinds of new Whole Foods brand spice grinders and mixes to try out, and it's been quite entertaining to dream up a few creative ways to use them in some new recipes this week. These muffins feature the Winter Baking spice mix, which includes sugar, cinnamon, lemon zest, orange zest, allspice berries, cloves, vanilla bean, nutmeg, and cinnamon. Contrary as usual, I decided to use this one in the dead of summer -- you know, why not? And wow, we loved the result -- a nice subtle, warm spiced flavor really complements this light apple muffin. We used a combination of caramelized apples, cinnamon apple sauce, and apple butter to get a complex and layered apple flavor going. (Coming up next, we're going to build a savory recipe with two other spice grinders that have us in brainstorming mode today.)


Caramelized Apple Spice Muffins

1 tablespoon olive oil margarine
2 apples (peeled; finely diced or shredded)
1 tablespoon light brown sugar
1/4 teaspoon cinnamon
pinch of sea salt
1/3 cup canola oil
1/2 cup applesauce
2 tablespoons apple butter
1 egg (beaten)
2 teaspoons vanilla
1 cup flour (we used half all-purpose and half whole wheat pastry flour)
1/2 teaspoon baking powder
1/2 teaspoon baking soda
1/2 teaspoon sea salt
1 tablespoon crystallized ginger
15 turns of the Whole Foods Winter Baking spice grinder

Crunchy Topping (optional):

1/4 cup walnuts (chopped)
15 turns of the Whole Foods Winter Baking spice grinder
1 tablespoon light brown sugar
a pinch of sea salt
1 tablespoon olive oil margarine

In a medium-sized pot over medium heat, melt the margarine and then add the apples. Stir to combine and then add brown sugar, cinnamon, and salt. Stir occasionally and add a tablespoon of water once or twice if pan gets too dry. Once apples are caramelized after about 15 minutes, remove from heat and set aside.

In a large bowl, whisk together the wet ingredients: oil, applesauce, apple butter, egg, and vanilla. Set aside. In a medium-sized bowl, whisk together the dry ingredients: flour, baking powder, baking soda, and sea salt. Add dry mixture to wet mixture and stir until just combined. Fold in the apples and the crystallized ginger. Using a spring-loaded scoop, scoop a level amount of muffin mixture into pan lined with muffin cups. (Optional step before baking for a crunchy top: mix together the Crunchy Topping ingredients and spoon it on top of each muffin; finish with a 1/2-teaspoon-sized slice of margarine.) Bake for 25 minutes or until tops are golden brown. (Makes 9 muffins.)

NEW CONTEST: Want to try some of the new Whole Foods spice mixes and grinders? You're in luck! We reserved a few for one of you to try in your own kitchen: Citrus, French Soup, Bouquet Garni, and Crystal Pools, a sea salt, lavender, lovage, chamomile, lime leaf, cornflower petal, and tarragon blend. We will mail all 4 out to one winner who lives in the U.S. To be in the running, comment below about how you would use one or more of the spices mentioned in this post, and we'll select (by random number generator on Wednesday evening, 8/1/13) one winner to receive the four products! We moderate comments, so don't be alarmed if yours doesn't show up right away -- it will be posted as soon as we check in.


Friday, July 26, 2013

Vegetarian Squash Ribbon Jambalaya by Chef Ryan Trimm

We love working with Melissa Petersen, the editor and publisher of Edible Memphis. If you are not familiar with the publication, it's a wonderfully informative look at our region including the bounty of artisans, farmers, personalities, and chefs in this area. The magazine focuses on regional and seasonal food, and there is no better time to focus on what's in season than right now. 
Below is an excerpted recipe from an article we wrote called "A Great Deal of Middle Ground," which is about three well-known chefs, Ben Smith, Kelly English, and Jennifer Chandler, going meatless for 30 days. Why would they do that, and what challenges did they face? To find out, locate a copy of Edible Memphis at Whole Foods, Booksellers, or one of the many restaurants and stores that keep copies available around town. (See right side of link for list.)

From "A Great Deal of Middle Ground":
Summer in the South is all about the bounty of fresh garden vegetables. The farmers markets are full of everything from squash to peppers to eggplant, mushrooms, tomatoes, and so much more. If you decide to try a thirty-day vegetarian challenge, it’s a great time to cook a meal at home; Chef Ryan Trimm of Sweet Grass and Sweet Grass Next Door, who has himself followed a two-week vegetarian challenge, has just the dish for you. Jennifer Chandler had Chef Trimm’s Vegetarian Squash Ribbon Jambalaya one night when she was out to eat with friends at Sweetgrass. Trimm was kind enough to share this simple summer recipe with Edible Memphis.

Vegetarian Squash Ribbon Jambalaya by Chef Ryan Trimm
2 tablespoons canola oil or unsalted butter
1 small yellow onion (sliced into half moons)
2 medium yellow squash (thinly sliced on mandolin)
2 medium zucchini (thinly sliced on mandolin)
1 medium carrot (julienne)
1 medium red bell pepper (julienne)
1 medium green bell pepper (julienne)
1 medium tomato (diced)
1 cup English peas (blanched)
1 tablespoon minced garlic
1 tablespoon Cajun Spice (like “Slap Ya Mama”)
½ cup dry white wine
3 cups vegetable stock
1/4 cups chopped parsley
3 cups cooked rice (to serve)

Heat a large pan over high heat until it starts to give off a little smoke. Add the oil, and the onion, squash, zucchini, carrot, red and green bell pepper, tomato, peas, garlic, and Cajun Spice. Cook, stirring often, until vegetables pick up some color, about 6 minutes.  Deglaze the pan with white wine and add stock.  Add parsley and reduce broth by about 1/2.  Serve in a bowl over rice. (Serves 4.)

Wednesday, July 24, 2013

Southern Vegetarian Cookbook Event at the Memphis Botanic Garden Farmers Market on Wed., July 24

(Update: We had a great time at the market this afternoon! If you're in Memphis and still would like to snag your own copy of our cookbook, it is available at Booksellers, Trolley Stop Market, and The Cosmic Coconut; out-of-towners, you can find it here online. Thanks so much to everyone who came to see us today -- y'all be sure to keep us posted about what you're cooking! -- Justin and Amy)

Hey, come on and stop by the Memphis Botanic Garden Farmers Market today starting at 2:00 p.m. -- we'll be signing copies of our cookbook, The Southern Vegetarian, and you can pick up all kinds of great stuff there this week! 

Tuesday, July 23, 2013

5 Quick Questions with Kevin West, Author of Saving the Season: A Cook's Guide to Home Canning, Pickling, and Preserving


Saving the Season is the kind of cookbook that reminds us of a beautifully written novel or a stellar short story: it drops you into someone else's world for a long, dreamy while and the voice rings real and true throughout. Read it to learn how to preserve all the stuff that's coming in this summer -- the recipes are precise and will make you feel like a pro -- but in your reading, you'll also be able to understand your food and its history so much more. 

It's lucky for us that author Kevin West is going to be in Memphis this Thursday evening at Booksellers. Stop by around 6:00 and grab your copy and get it signed or stock up on a few signed copies as holiday gifts for all of the serious home cooks you know. This one is sure to become a classic, y'all. 

This week, Kevin was kind enough to answer a few of our burning questions -- and to share his cream-style corn recipe (detailed below), which we know we're going to have to try very, soon.  

1. TCV: You're back in Tennessee this week! What do you remember most, think about, or miss when you think of your time spent here?

Kevin West: I can't think of Tennessee without thinking of my grandparents' farm in Blount County: the red clay banks of their long, long gravel driveway; the view of the Great Smoky Mountains from up by the barn; throwing rocks in the pond; the prickly feel of picking okra in the early morning; the taste of sun-warmed tomatoes pulled off the vine; the silly pleasure of eating corn on the cob and picking your teeth at the table even though you know better; the smell of cedar shavings when Papa whittled. 

The farm is gone now, but the time I spent there when I was little shaped me to the core. More than any other place, that "rich spot of earth," to use Thomas Jefferson's phrase about his beloved Monticello, is where I come from. That's what I miss most.

2. TCV: What would you suggest that a beginner try to can, preserve, or pickle first?

KW: Start with whatever is coming in from local gardens and farms. At this time of the year, I'd advise folks in this part of the world to think seriously about putting up some peaches in syrup, wild blackberry jam (if it's not already too late), pickled green beans, and canned tomatoes. 

3. TCV: Please tell us a little more about the idea of preserving certain things for the occasions and meals you plan to create later on for certain people or events. I loved that part of your book -- that's pretty much what food is all about to us, too: time spent with the people we love. 

KW: One of the pleasantest aspects of canning work is that there is time for your mind to wander while your hands are busy. My mind usually wanders in the direction of what I'll be eating next, so standing in the kitchen making preserves is when I plan out future meals. For instance, I like to pickle onions every year in late spring when they are about the size of ping pong balls, and it's sort of a fun thought experiment to dream up a dish to use them in each of the 4 seasons. 

As for who gets what jar as a gift -- don't worry. Once your family and friends find out about your preserving habit, they'll let you know about their favorite jams, pickles or relishes--hint, hint.  

4. TCV: Simplest recipe (Southern-themed or otherwise) that you love and crave and make all the time and want to share?

KW: This time of the year, I cannot get enough cream-style corn. The way I make it is to cut the corn off the cob and very gently stew it with some butter until it's warmed through and bubbly. Then I stir in some caramelized shallots and a handful of basil (especially that purple opal basil) cut into a fine chiffonade. A double serving of this corn with a sliced tomato and a few grilled zucchini drizzled with olive oil makes as fine a summer meal as I could want. Even if you don't have shallots or basil, corn cooked this way is still wonderful in its unadorned state.

5. TCV: We have an abundance of tomatoes right now -- there are about 50 of them just washed and waiting on the kitchen countertop right now and more to come. What do you think we should do with them? 

KW: It depends a bit on the type of tomato. It they are the plum-type, then I'd suggest putting them up as crushed tomatoes -- the standard, old-fashioned "canned tomato" approach. if they are bigger, juicier beefsteak or heirloom tomatoes, I'd turn them into a sauce and reduce the sauce a bit before canning. 

But whatever you do, be sure to set aside a few of the biggest, prettiest tomatoes for a tomato sandwich! 

(TCV: We'll take that advice for sure! Here are our simple tomato sliders, which may morph into big old lunch sandwiches tomorrow.)

Monday, July 22, 2013

Peach Salsa

There are a bunch of other things in this salsa besides peaches, but they are what really make it different and, in a good way, a little bit sweet. You could try pairing this with our King Oyster Mushroom Scallops minus the dirty fried rice for a pretty summer plate. We've also liked baked blue corn tortilla chips with this salsa or some guacamole lately because we've been on a no-fried-chips, no-fried-anything kick that may just become a permanent thing.

Peach Salsa

2 teaspoons olive oil
1 shallot (minced)
2 ears corn (kernels cut from cob)
1 pinch ancho chile powder
2 teaspoons mezcal or tequila
2 medium peaches
2 teaspoons cane sugar
juice from one lime
1 tomato (diced)
1 avocado (diced)
1/4 cup queso fresco (diced)
fresh cilantro (chopped; optional)
sea salt and cracked black pepper (to taste)

In a medium skillet over medium heat addd the olive oil and shallot and cook until almost translucent. Add corn and stir; cook for 5 more minutes and stir occasionally. Add ancho chile powder, salt, and pepper to taste, and deglaze the pan with mezcal or tequila. Set aside. Combine peaches, sugar, and lime juice. Set aside. Add diced tomatoes, avocado, and queso fresco to a bowl along with fresh cilantro, if using. Combine it with peach mixture and corn mixture. Salt and pepper to taste and serve with chips.

Thursday, July 18, 2013

Saving the Season by Kevin West: Author at Booksellers in Memphis on Thurs., July 25!


We LOVE this book! Grab your copy at Booksellers and go see the author at this event 
coming up next week. 

Monday, July 15, 2013

Cedar Plank Wild Mushrooms + Mustard Vinaigrette

Vegetarians, go ahead and claim some cedar plank space on the grill this summer! Using a few different kinds of wild mushrooms works out really well with this method -- and as a bonus, it will fill the air with the amazing smell of cedar smoke. This struck us as the type of main vegetarian dish that could compete with the usual old proteins in terms of heartiness and flavor, and it would be a super-convincing Meatless Monday idea for anyone who may be reluctant to try something different. Really, who could resist having what looks like a still life of a mini-forest floor for dinner?


We found a couple of big cedar planks at Whole Foods for $8 and also spotted 4 smaller ones for the same price if you wanted to serve this dish as a small appetizer. Oh, and of course we're not at all tired of grilled peaches yet but did find that halving them, drizzling them with olive oil, and putting them on cedar planks, too, was a nice change for dessert.

Cedar Plank Wild Mushrooms + Mustard Vinaigrette

1 16-inch cedar plank (or 2 8-inch)
4 to 5 new potatoes (quartered)
3 to 4 cups of assorted wild mushrooms like chanterelle, hen of the woods, and large morel
1 onion (peeled and cut into half-moons)

Mustard Vinaigrette (recipe follows)
2 to 3 ounces soft goat cheese
fresh dill, parsley, and chives (to garnish)

Soak cedar plank in water for at least one hour. Blanch potatoes in salted water until fork tender but not falling apart. 

Preheat your outdoor grill to medium. The temperature gage should be between 350 and 425 degrees.

In a large bowl toss clean mushrooms and sliced onions with the Mustard Vinaigrette. Place the empty cedar plank down onto the grill for 4 minutes to heat one side. Remove plank from the grill and arrange the potatoes on the warmed, marked side of the plank. Top potatoes with onion slices and mushrooms. Return plank to the grill, shut the lid, and allow it to cook for 10 minutes. Next, place chunks of goat cheese around the plank and cook for another 5 minutes. Garnish with dill, parsley, and chives. (This is a perfect dish for sharing; serves 2.)

Mustard Vinaigrette

This is a great all-purpose mustard dressing. Use it on salads or brush it on vegetables before they hit the grill.

2 tablespoons olive oil
1 tablespoon honey

1 tablespoon champagne vinegar
1 tablespoon grainy mustard (like Zatarain's)
Kosher salt and cracked black pepper (to taste)

Place olive oil, honey, vinegar, mustard, salt, and pepper into a 1/2-pint mason jar, screw on the lid, and shake it until dressing is emulsified. Set aside until ready to use.

Saturday, July 6, 2013

Vegetarian Paella on the Grill

We have been all about family-style meals lately. We understand that they are, in a way, challenging, in that they're a little different from the norm. You sit down to a meal and there is one big plate of food for each dish. You patiently wait for your turn, and you closely eyeball your tablemates as they scoop a portion onto their plates. It involves a different way of thinking, it's truly sharing a meal, and we love it. The whole idea echoes the sentiment of community, fosters new conversations...and encourages clean plates.

We are so lucky to have so many opportunities to share meals with friends and family this week. In the past 24 hours, we have had a meal of grilled fig salad, truffled corn and shiitake mushrooms with ricotta dumplings, and this summer's omnipresent homemade ice cream sandwiches with people we have known since before we had driver's licenses, shared a giant paella with some of our most trusted friends, and we've squirted pickle relish and yellow mustard on a few veggie dogs and enjoyed some really delicious elote salad at some of our oldest friends' new house in North Mississippi. It's days like this that let us know just how truly blessed we are.

In the flurry of cooking, eating, and celebrating, there was no time to write down a recipe, but we'd like to share the process of making a paella. It's an inexact science that changes with the mood and shifts with the winds. Like a great meal, the cooking of a paella is best when it's shared. So when Michael and Kelly came over for 4th of July lunch, we decided that we would all bring something to throw into the pan. We called it paella by committee.


Michael and Kelly brought risotto rice, green olives, hearts of palm, artichoke hearts, spanish paprika, saffron, kale, green onions, and the large paella pan that was a gift from us for his birthday. Luckily, he also brought the knowledge of how to make a proper paella. We supplied the roasted red peppers, yellow peppers, onions, garlic, tomato paste, white wine, vegetable broth, olive oil, sherry vinegar, fresh herbs from the garden, tomatoes, eggs, and shallots.

First you need to make a sofrito by blending together a tomato, parsley, yellow pepper. paprika, onion, tomato paste, sherry vinegar, salt, pepper and garlic in the food processor until liquidly. Warm the saffron in a quart of stock and a 1/2 cup of wine. Place the paella pan over medium-high heat on your outdoor grill and add a 1/4 cup of olive oil and 4 to 5 good handfuls of rice. Toast until rice is golden brown. Add a few good handfuls of chopped kale and then the sofrito. Cook over medium-high heat until most of the liquid has evaporated, add a cup of stock, and continue to cook. The rice will need 4 to 5 additions of stock before it softens. Make indentions in the rice, crack the raw eggs in, and cook until eggs have set. Top with grilled or sautéed green onions, green olives, artichoke hearts, hearts of palm, and roasted red peppers. Finish with chopped tomato, fresh herbs, shallots, and a sprinkling of sherry vinegar.

The truth is that there is no really wrong way to make paella. It's the kind of thing that should be made out of what is on hand and shared with those you love.

Tuesday, July 2, 2013

Portobello Pastrami + Microwave Sauerkraut & Horseradish Mustard

Chef Jimmy Gentry of Paradox Catering & Consulting sent us a great recipe for Tofu Pastrami Microwave Sauerkraut and Horseradish Mustard that he'd been making for his vegetarian and vegan clients. It looked delicious, so it got us to thinking; if you can pastrami meat and tofu, what else can you pastrami?

Portobello mushrooms immediately came to mind. Their meaty flavor and firm texture make them a shoo-in for this role. We used Chef Gentry's pastrami cure, sauerkraut, and mustard to create one great-tasting pastrami sandwich from portobello mushrooms -- you could surely do the same with tofu or anything else for that matter.

This version is vegan, but if you'd like a little cheese, go ahead and add a few slices of swiss, and while you're at it, a smear of good olive-oil mayo. This is a recipe we bet you'll make again and agin.

Portobello Pastrami

1 tablespoon cracked black pepper
1 teaspoon ground coriander
1 teaspoon smoked paprika
1 teaspoon Kosher salt
1/2 teaspoon granulated garlic
1 tablespoon olive oil
3 to 4 medium portobello mushroom caps
6 to 8 slices marble rye (toasted)
Microwave Sauerkraut (recipe follows)
Horseradish Mustard (recipe follows)

Make the pastrami cure in a medium  bowl by mixing the pepper, coriander, paprika, salt, and garlic together. Drizzle the olive oil over the mushroom caps so that they're evenly covered. This will allow the cure to stick to the mushrooms. Liberally coat each mushroom with the cure on both sides and place in a covered container in the fridge for at least two hours or up to 24 hours.

Preheat your outdoor grill to high. Grill mushrooms gill-side-down for 4 minutes, flip, and grill the smooth side for 4 minutes or until nicely marked and the mushroom is soft and pliable. Depending on the thickness of the mushroom, this could take longer. Place mushrooms back in the covered container and back in the fridge to cool.

Slice thin strips on the bias or diagonally to create larger "cold cuts" from the mushroom. Serve on marbled rye with Microwave Sauerkraut and Horseradish Mustard and pickles. (Makes 3 to 4 sandwiches -- depending on how high you stack 'em.)

Microwave Sauerkraut

This is the fastest way to make great-tasting sauerkraut this side of opening a jar lid. Fermenting a big batch on your kitchen counter can take weeks; this takes 4 minutes.

1 medium head purple cabbage (cored, thinly sliced)
1 medium white onion (thinly sliced)
1/2 cup apple cider vinegar
1 tablespoon caraway seeds
1/8 teaspoon cane sugar
1/2 teaspoon Kosher salt

In a large microwave safe bowl, mix the cabbage, onion, vinegar, caraway, sugar, and salt until well incorporated. Cover and microwave on high for 4 to 5 minutes. Let it sit, still covered, until it's cool to the touch and most of the brine has been absorbed. Refrigerate until ready to use. Keep it covered in the fridge for up to a week.

Horseradish Mustard

3 tablespoon dijon mustard
1 tablespoon prepared horseradish
2 tablespoons lager or porter beer

In a small bowl mix the mustard, horseradish, and beer. Set aside until ready to use.

Tuesday, June 25, 2013

Banana Pudding Ice Cream Cake

This idea came from various daydreams about how to make everything we like to eat during the rest of the year summer-ready. Now, banana pudding, whether it's a childhood classic or a crazy modernization, is good all the time, no question about that. But, oh my goodness, it is all of a sudden verging on painfully hot here in Memphis. And a little cold dessert just helps make that okay. 

The trick is to make your own banana ice cream first and then whip some cream; everything else is simple layering and freezing ahead of time. (Oh, this is our very first ice cream cake! We made it for Fox's baptism lunch. After the ecstatic reaction it got, we'll surely dream up another kind in the same vein soon. Like with chocolate...)

Banana Pudding Ice Cream Cake 

3 bananas (mashed well)
1 1/2 cups whole milk
1/4 cup heavy cream
2 tablespoons Greek yogurt
1/2 cup cane sugar
2 teaspoons vanilla extract
1/2 teaspoon ground vanilla bean (optional)
1/4 teaspoon sea salt

2 bananas (thinly sliced in rounds)
Vanilla wafers (crushed; about 1 cup)
Easy Whipped Cream (for topping; recipe follows)

Whisk together 3 mashed bananas, milk, cream, yogurt, sugar, vanilla, and salt. Pour into ice cream maker and while it spins, slice 2 bananas and crush vanilla wafers. Line a square pan with 2 layers of parchment paper -- it should overlap to make 'handles' that will pull out the cake once it's frozen. Start layering ingredients: crushed wafers, then bananas, and then spoon half of the ice cream on top. (It's fine, and actually works better, if it's a little melty because you're going to freeze the whole thing anyway.) Repeat layers and then finish with more wafer crumbs on top. Freeze for about four hours or overnight. When you're ready to serve, pick up paper 'handles' and flip cake onto a flat surface like a cutting board. Spread the whipped cream on top. Freeze it again for about 10 minutes and then, with a good sharp knife, cut it into squares to serve. (Serves 16 with small pieces or 8 with generous slices.)

Easy Whipped Cream

1/2 cup heavy whipping cream
1 tablespoon powdered sugar
1 teaspoon vanilla extract

1/2 teaspoon ground vanilla bean (optional)
pinch of sea salt 

In a large bowl whisk cream vigorously until slightly stiff. Add sugar, vanilla, and salt and whisk to combine.  Set whipped cream aside in the refrigerator until ready to top cake and serve.